

This post is about how you can make a pendant light out of a lamp shade without calling the electrician. Also, at the end of the blog post I am sharing some advice for renters regarding decor and shopping.
This is one good hack for renters and people like me who cannot commit to something in certain places.
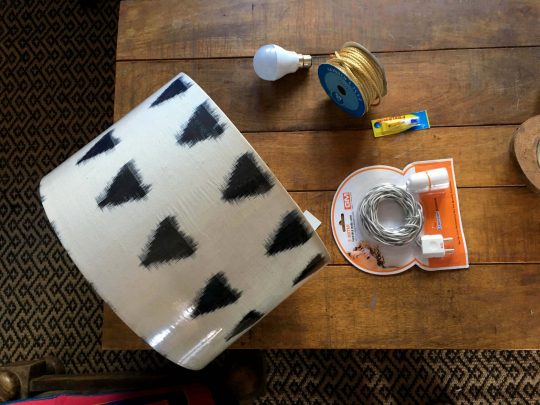
You will need:
- A light weight lampshade (Mine is from Varnam Craft Collective)
- A 5 mts flexible wire set with Plug and socket set. (This one is available in most big grocery stores like More and Spar in their electrical section and it costs less than 200/-. I tried looking for it online, but couldn’t find. Another brand is available on BigBasket.
- Some Colored yarn or cord: Optional (This is to dress up the wire, Iit took me 25mts of thich cord to cover half of it)
- Super Glue to stick ends.
- One bulb for the socket
- A hammer and some wire holder clips or command hooks
The flexible wire set comes with a plug and a socket all connected, so you can simply open it and start using it. If you find a cord that looks black or works for your decor, you can completely skip the next step and directly move to installation. 5 Mts of length is approximately 16 feet, so even if you drop your pendant 6ft from the ceiling, you still have 10 feet length to take it to the nearest plug point.
My wire was not the prettiest, so I wanted to dress it up a little bit with some gold yarn. The easiest way is to wrap the yarn around is circles and add a little bit of glue in between 10 to 15 rows so it wont come undone. I did a little more tedious process by the end of which I was frustrated. I had 25 mts of this cord and I ran short.
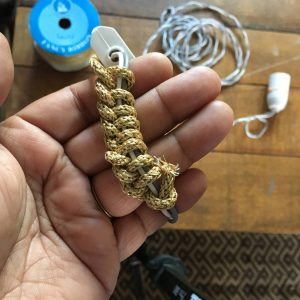
Its hard to explain the knot that I am making, its the first knot you learn when you learn to knit. All I did was I kept knotting and pushing it down. Sixteen feet was a lot of knotting and pushing down, but the best part is that it keeps twisting as you go and makes the most lovely swirls.(I am going to try a crochet needle and see how it works and keep you posted) You can either push them close so you get closer swirls or stretch them a bit. They look lovely in any case.
I secured the ends with some super glue (Glue cord to cord, dont glue it to the wire)

Next comes the installation:
Like I said, 16ft is a lot of wire. Decide where you want the pendant to drop from. Since its a light weight pendant, it can be held in place with wire holder clips which can be hammered directly into the wall. Command hooks will need to be applied on a clean surface and waiting 24 hrs before you hang something. I haven’t decided where i want my pendant, Once I do, I will share images here.
I am sure this gives you plenty of ideas. You can even turn them into floor lamps by making a tripod with bamboo sticks or using a camera tripod or any other genius hack that you can think of.
Plug it into the nearest socket, install the bulb and enjoy your new light.

Note: Command hooks adhere differently to different quality of walls, so test before you hang. .
Renters: I was renting for close to ten years and in the process I have accumulated some wisdom that I would like to share today. I am not the person to wait till I get my own place to decorate or to even buy something I want. I cannot be constantly living in the future, which I am not even sure of. Also, if I had done that, I would have lost ten precious years of my life. I believe in living well within my means.
If I had to give some advise to renters then here it is:
Your current home is your “Home” till you move out:
I feel sorry for people who live “temporary” for years without doing anything in the space they live in and the excuse? “Oh we will be here probably for only a year or two maximum!”. Only a year?? that is 365 days! Your home is your safe place and just like how you take care and decorate the body you live inside, you will need to make your rental space more “home”!
Also, if you constantly feel like its a temporary arrangement, it will eventually have an effect on other decisions of your life. Its human psychology. I dont know how to put it across for better understanding. Its like sailing on a boat and waiting to jump out on the shore you cannot see. Even if you can see it at a distance, settle down and enjoy the waters and when you reach the shore, get off.
Make your “Splurge” and “Save” lists:
Depending on what is important to you, splurge on things that you can carry with you when you leave. Like in the case of this DIY, the shade is a splurge and the wire fixture is a save. Invest in rugged, solid pieces of furniture that will survive the moving. I am thankful for my love of antique and vintage Indian furniture, I have never had a breakage in the six houses that I have moved. Where as the temporary cheap computer table that I had, did not make it after two.
If something is reasonably priced and you love it, buy it!
There is this thing called inflation. And also when it comes to physical stores, popularity and scaling up increase prices. Stores shut down, brands disappear and so does your beloved piece. Its happened to me that I have waited so long to buy something I loved and could afford, and the store suddenly scaled up and prices doubled. Good for the store, but I cant afford their products anymore. Two years ago online, I found this gorgeous tan sofa on a designers website, they were running a discount and it was available for 15K and I wanted it for my studio but did not buy. A few weeks ago i went back to the site to spy on my beautiful piece. it was still available and now cost 45K. Regret! Regret! Regret!
If you are in Bangalore, I have an e-book which is a list of “101 Places to Shop for Decor in Bangalore“, you an buy it here. If you are not in Bangalore, then I have an e-book which is a list of “121 Websites to shop for Decor” and you can buy it here.
Happy Shopping and happy DIY!
Leave a Reply