

My dining table is a find from an online local classified website. I picked it up from an old couple who wanted to make more space. The table was in good condition, but the chairs were ugly beyond everything. The thought of even trying to do something with them was depressing me, so when I got them delivered to my place, I asked the tempo driver if he would like the chairs. He was happy to take them and I was super happy to let go.
Now, the top was an ugly laminate at was used on every furniture some 15 years ago. Since a dining table will be a frequently used piece of furniture, painting was not an option. So I decided to decoupage it.
What I used?
1. An old dictionary
2. Fevicol & water (1:1)
3. Acrylic paint in metallic bronze
4. Sandpaper
How I did it?
- I first scraped the the top with sand paper to roughen up the surface, this make the glue stick better.
- I mixed Fevicol and water in 1:1 proportion and made sure it’s a homogeneous mixture.
- I separated a bunch of pages from the dictionary to get started.
- Now since the surface of the table is large ( 4 ft dia) I used my hands to pour and spread the Fevicol-water mixture evenly on the top, you could use a brush.
- I then placed single sheets of paper randomly on it, put a finger on the centre of the sheet and applied a coat on the sided.
- I did that till I had covered the entire table. Don’t worry if you get small gaps that don’t get covered or you have extra paper sticking out from the corners of the table. The extra paper can be trimmed and the small gaps get covered in the 2nd round.

- Let it dry. You know it’s dry when you see a glossy surface and it doesn’t stick when you touch.
- Next I applied another layer of Fevicol-water solution on top of it and repeated the step.
- 2 layers are enough to get an even surface, once it’s dry, apply another layer of Fevicol water solution and let it dry overnight before you use it.
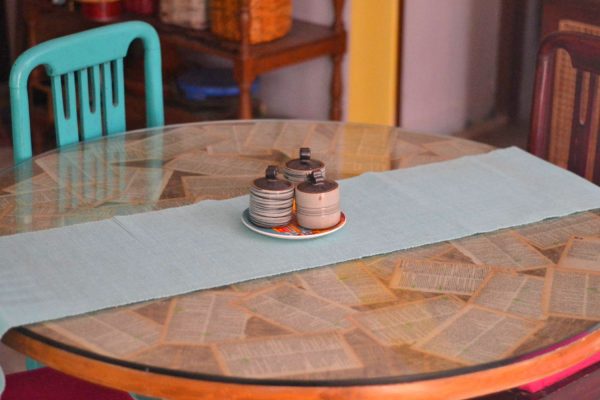
- But I dint stop there. To give it a little decorative look, I applied a layer thinned down metallic acrylic color on it.

- While it was drying, I got the kids to go through the dictionary pages and highlight the words that they thought were happy and fun. I used those pages to go on the top layer, and made sure I was not covering the entire table so that the metallic color was visible in places.

I have a super clumsy family that makes a mess on the dining table, so I had to put a glass top on it. Now when the kids are having a leisurely breakfast or dinner, they go through the words on the table, its fun.
P.s. This can be used directly on plywood, if you are looking at making some plywood furniture on a budget, opt out of putting a laminate and directly decoupage it.
P.P.s: To get posts in your imbox, subscribe by adding your email address on the top right corner. To get all posts one after the other click on the tag 30 Days of DIY.
Leave a Reply