

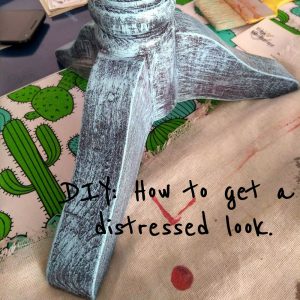
This post is about how you can achieve an aged and distressed look using a method called dry brushing. It can be used on wooden artifacts or furniture. Here I have tried it on a wooden decorative and a side table.
 I have been fascinated with distressed furniture for a very long time now that its like forever. Since most of my furniture at home is solid wood, I did not want to paint any of them, but I constantly crave for a large piece of distress painted furniture. Distressing looks the best if your piece has a lot of detailing like carving or grooves. I was experimenting with small things and I loved the finish so much that it was worthy of a blog post.
The method that I want to talk about in this blog post is dry brushing. The name is quite self explanatory which means you use an almost dry brush to paint and get the desired look.
What you will need for the DIY?
- A wooden piece of furniture or decorative.
- Wood Primer.
- Paints 2 colors, preferably contrasting (base color (Solid) and top color(Color of the distress)) I have used asian paints water based enamel here. You can find it at your local Asian paints store. Since they are water based, its easy to use, dries quickly and doesn’t smell as much.
- A hard bristle brush.
- A rag cloth.
The Method!
-
- Whenever your project requires painting wood, you need to do is prep your piece first. Clean your wooden piece with a damp rag so you get all of the dust out and give it one coat of wood primer and let dry.
- I have used a light teel color for my base coat. So once the primer is dry, paint the entire piece with your base coat. (I used to ignore the bottom or any hidden places before but not anymore. I want my piece to look good even when it is upside down, so I painted the bottom too) Let it dry completely before you start the dry brushing process.
- Once the base coat is completely dry we are ready to start the distressing process. Now take your second color and pour a little bit of the paint on a plastic plate. This process is important so that you don’t end up dipping your brush deep into the paint and wasting a lot of paint in the process.
- Dip your hard bristle brush in the paint and then dab it on the waste rag until you have all the excess paint out and then slowly with light strokes paint on top of your base coat in one direction. You slowly see very little bit of the paint transferring onto your wooden piece. If you are not very confident about doing it on your piece directly, practice it on a waste piece of wood or hard paper. P.s. Brushing in one direction you get a better finish.

- You can continue doing dry brushing until you are satisfied with the finish. If during the process, you get a lot of paint on one side you can immediately wipe it off with a rag. To show you how its done I have also included an abruptly ending video that I took on my phone.
I was quite happy with how my decorative wooden piece turned out so I stopped the brushing process early on. 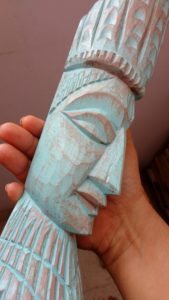 I did another side table base which has hundreds of strokes of dry brushing absolutely gorgeous. Now I wasn’t sure what I want for the top of the side table not putting a picture of when I decide to finish it I will let you guys know.
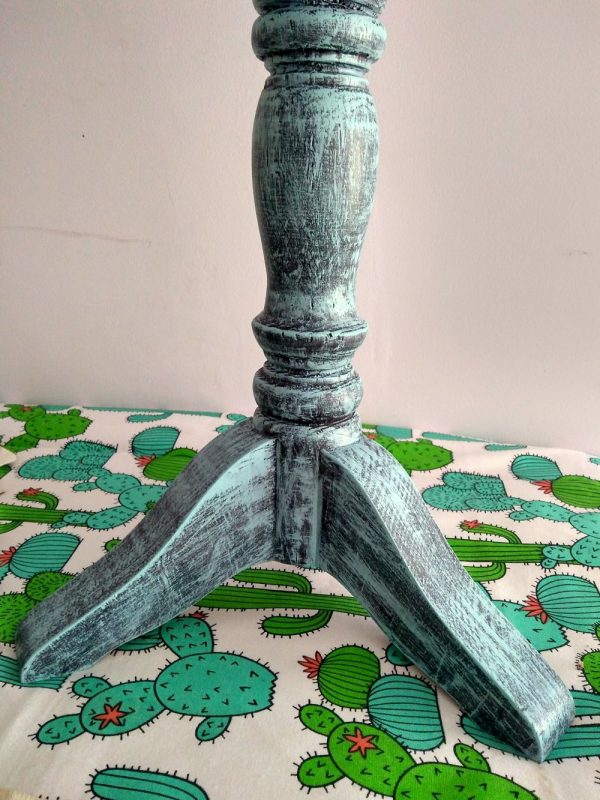 I think this method is less messy and easy to achieve, I am planing to try some other methods of distressing and see if they make it to a blog post. In the mean time, let me know how you liked this tutorial and let me know if you are going to try it.

Leave a Reply