

This post is about how you can achieve an aged and distressed look using a method called Wet Distressing. It can be used on wooden artifacts or even furniture. Here I have tried it on a pair of wooden candle holders.
This is the second method of Distressing that I have tried and I must tell you, I am enjoying the process of trying different methods. I think naturally distressed furniture has a charm of its own, but the effect can be achieved to some extent using paint techniques. If you haven’t seen the post on Dry Brushing method of distressing, you can read about it here. While dry brushing works on flat surfaces too, for wet distressing, it’s best when there are carved details on the surface. 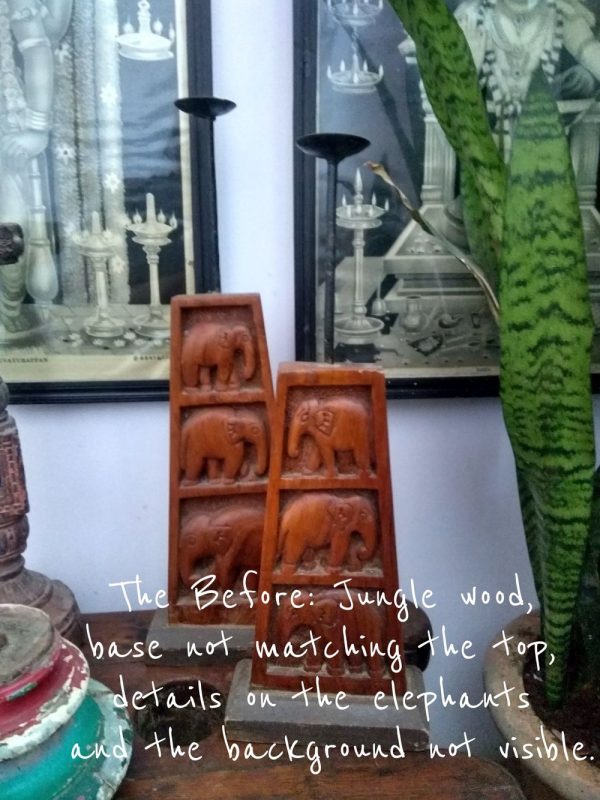
For wet distressing, you can either use one color on wood, or two colors one over the other and when you distress that the base color is exposed in distressed areas.
What will you need?
- A wooden piece of furniture or artifact that has carved details.
- Wood Primer ( For the Paint on Paint method)
- Paint: 1 color if you want the wood to show when you distress. 2 colors if you want a different color to show when you distress, preferably contrasting (base color (Solid) and top color(Color of the distress)) I have used Asian paints water based enamel here. You can find it at your local Asian paints store. Since they are water based, it’s easy to use, dries quickly and doesn’t smell as much.
- A paint brush
- A kitchen scrub or steel wool.
The method: Paint on wood!
- Prepare the piece always. Clean your wooden piece with a damp rag so you get all of the dust-out and let dry.
- Since I wanted to have the wood show when I distress, I did not prime this piece. I used the paint directly on the wood.
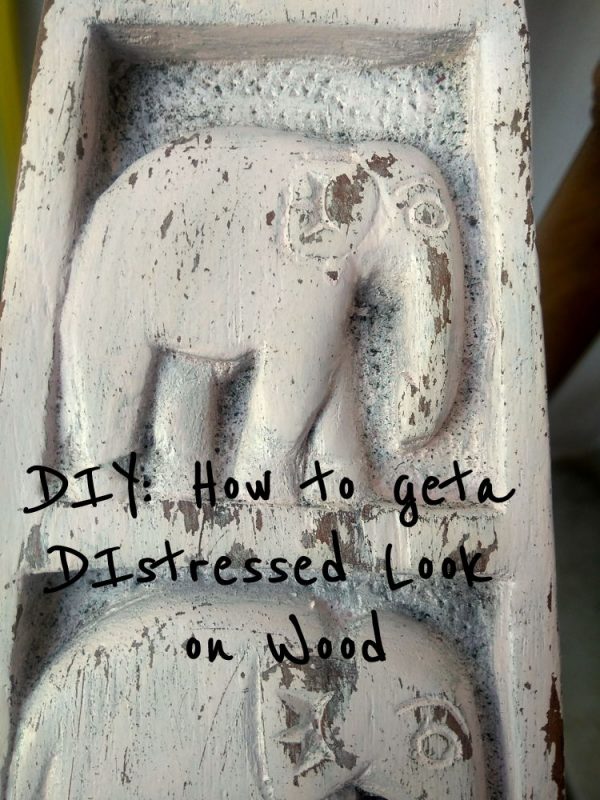
- Please don’t ask me what color this is coz I mixed a few leftover paints to get this baby pink which I absolutely hate. I painted the entire piece with one coat of paint.
- Wait for 10 minutes or so, and touch the paint to see if it sticks to your finger. If it does, wait for another 5. Since it is water-based enamel, it dries really quick and when you touch the paint, if it does not stick to your finger means its ready for the next step.
- Use steel wool and gently rub on edges and details that will tend to get distressed naturally. Doing gentle strokes makes sure you are taking off little paint at a time and can stop when are satisfied.
- If you take off too much, you can paint that portion again and start all over.
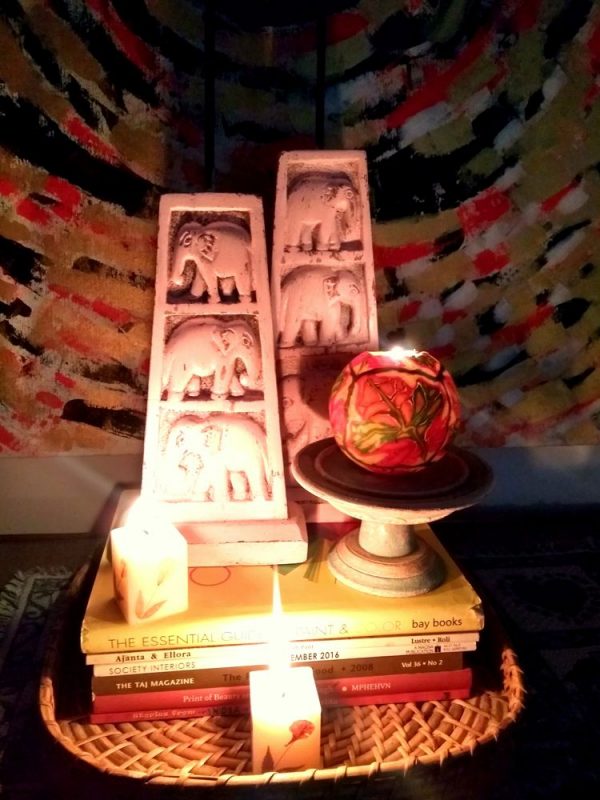
- Once you are satisfied with the result, let the piece dry overnight so the paint adheres fully.

The method: Paint on Paint!
- Follow step 1 from the last method.
- Use wood primer and give it one even coat. Let it dry completely. When using primer and multiple colors, dont rush, make sure each coat dries completely before doing the next.
- Paint one coat of the base color that you want to show under
 the distress. Let it dry an hour or so and do another even coat. Now let this dry overnight, so the paint is fully dry before you put the top coat.
 - After the base coat is dried overnight, give it one coat of the topcoat color.
- From here, the steps are same as previous Step 4, 5, 6 and 7.
The result is pretty good. Even though I hate the color, I love the finish. From the time I did this DIY and now, I have already painted it white and repeated the distressing process.
The other distressing process I have tried is resisting distress, post coming up soon. Stay tuned. To know what I am working on currently, follow me on Instagram.
Leave a Reply